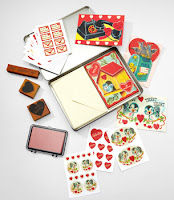
I came across these adorable stickers on Twig & Thistle and wanted to share! Visit the post here for a link to the FREE pdf download and instructions! These could be used in lieu of Valentines, or just to make that special someone smile. Enjoy!
Pictures are all from Twig & Thistle
Showing posts with label DIY Projects. Show all posts
Showing posts with label DIY Projects. Show all posts
Tuesday, February 1, 2011
Sunday, January 30, 2011
Onesie Project
My cousin is expecting her first baby in the next few weeks. Instead of getting something off their registry, I decided I wanted to do something different for them and their baby boy to be. I had seen some shower ideas where everyone makes a onesie for the baby, whether it's with fabric markers, or glue and fabric. I made them a set of three onesies with different animal shapes in fun fabrics. Since they are having a little boy, I stuck with reds, blues, greens and yellows for the fabric colors. Below are the steps to do this yourself and some pictures!

The Steps:
1. Go to your local fabric store and pick out some fabrics that you like. Remember that the shapes may not capture a large pattern, so look for small patterns that will still look great in small pieces. The fabrics that I used are quilting squares from Jo-Ann Fabrics. They were ideal for just getting a small amount of fabric in a bunch of different patterns.
2. Purchase Heat n' Bond paper which will attach the fabric to the onesie. I used ultra hold, but if you want to sew a boarder around the edges of your shapes, you need to get the "light" version of this paper.
3. Pick out some shapes and draw them on a piece of paper. Cut that shape out so that you can use it at an outline.
4. Iron a piece of the fabric (large enough for the shape that you have selected) onto the Heat n' Bond paper. Follow the directions on the package to make sure you are using the right side first.
5. Trace the outline of your shape onto the back of the Heat n' Bond, then trim the Heat n' Bond and fabric into your shape.
6. Remove the back of the Heat n' Bond paper and place your shape on the onesie.
7. Follow the instructions on the package to iron the shape onto the onesie with the correct amount of time of ironing.
These should be washable, however I have not personally tested that.
These make an adorable personalized gift for a baby on the way!
Tuesday, January 11, 2011
V-Day is coming!
So I know that Valentine's Day is one of those holidays that people may love or hate, but my Mom's birthday is on Valentine's Day, so it has always been her favorite holiday and thus has become a favorite of mine. Here are some fun valentine's cards, gifts and links that I have come across!


Check out some great DIY's on Pizzazzerie. From printable hearts to candy wrappers and treat bags, this is a great post!


All of the above can be found at www.fredflare.com
Check out some great DIY's on Pizzazzerie. From printable hearts to candy wrappers and treat bags, this is a great post!
Monday, November 29, 2010
DIY Wreath Project
My friend Jaime just made a beautiful wreath for the holidays and shared her project pictures with me. The wreath turned out so great and she got all of the materials on sale at Michaels! She used gold potpourri to add some sparkle to the standard wreath. I think it looks great!
Wednesday, November 24, 2010
Thanksgiving Printable from Potter + Butler
There is still time! I just came across this really cute printable for Thanksgiving. This would be really easy to add to your table last minute. Here is the link to the post on Potter + Butler and here is the link for the printable file. Check out their great blog while you are there. They are party ideas and lots of other stuff!
Tuesday, November 23, 2010
An Engagement Survival Kit
A dear friend of mine recently got engaged! She had sent me such a personal and amazing gift when I got engaged, so I knew I wanted to send her something different and fun. I put together a little "survival kit" to help get her started in her planning, and to keep her sane! I printed out little tags with her and her fiancé's initials so label everything in the kit. I included a nail file (I love this one with diamonds on it...it is similar to one that a friend of mine gave me!), Martha Stewart Weddings, a list of my favorite wedding blogs and online resources, a pack of thank you cards and a small journal to keep notes and ideas in. Everything went inside a fun tote bag!
Subscribe to:
Posts (Atom)


